In this guide, we will cover how to transform data or produce new data by calculating existing data, and we will go through the process of building our widgets using AngularJS for a ModelForm. Some of the ways explained here will follow the standard Django way of doing things, while others will follow the CODENERIX way.
When the software grows and matures, we usually need to customize some things better and add newer features over the existing ones. One of the most basic needs is data generation from other fields or data transformation while saving the information in the database.
Producing new data over existing ones is usually a straightforward step. Let’s explore it travelling from the server (backed) to the user (frontend):
1. Overloading the save() method in your model
This is a pretty straightforward backend solution solution. In your model, you create a new save() method that calls to super().save(). This can be done in two ways:
The first one is by modifying data before it gets written to the database:
self save(self):
  # Use existing data to setup the custom field
  self.custom_field = modifier(self.existing_fields)
  # Save and return returned data to keep consistency
  return super().save()
The second one is by modifying data and saving it again; in this way, you can pick up the PK from the object after calling super().save() and use it to recalculate it. (NOTE: if you have to save twice in your save() method, it usually means what you are doing is not a good idea)
self save(self):
  # Save existing data
  super().save()
  # Calculate seed based on the regiter's PK
  self.seed = create_seed_based_on_register_pk(self.pk)
  # Save it again and return returned data to keep consistency
  return super().save()
The third method extends the second one by modifying other models’ data after this one is written to the database. This way, we can pick up the PK from the object after calling super().save() and use it with the other model. A common example of this could be to add the just created object into an existing ManyToMany relationship:
self save(self):
  # Save existing data
  answer = super().save()
  # Lookup for the other object
  other = OtherModel.objects.filter(...).first()
  # Add our selves into the relationship
  other.custom_related_field.add(self)
  # Answer back keeping consistency between calls
  return answer
2. Using Django signals
This is a backend solution based on something that Django implements called signals. They are a great tool in complex scenarios, but keep in mind that they make the code harder to maintain, and those should be used only in situations where the other methods wouldn’t work. Read directly from Django’s documentation how to use signals. https://docs.djangoproject.com/en/5.0/ref/signals/
Signals can be incredibly useful in complex scenarios where different components need to react to events or actions in a decoupled manner. For example, you might want to trigger specific actions whenever a new user registers, a post is created, or an order is placed.
Signals introduce an element of indirection in your code, making it harder to follow the control flow. Since signals allow disparate parts of your application to interact, tracing the logic executed when a signal is triggered can sometimes be challenging. This can lead to difficulties in debugging and maintaining the codebase, especially as the application grows in complexity.
Example of pre_save signal:
from django.dispatch import receiver
from django.db.models.signals import pre_save
from django.template.defaultfilters import slugify

@receiver(pre_save)
def my_callback(sender, instance, *args, **kwargs):
    instance.slug = slugify(instance.title)
Example of post_save signal:
from django.dispatch import receiver
from django.db.models.signals import post_save
from django.contrib.auth.models import User

@receiver(post_save, sender=User)
def create_profile(sender, **kwargs):
    # write you functionality
    pass
3. The clean_<field>() methods at Forms classes
This is a backend solution based on Django clean_() methods.
Django clean_<field>() methods are special methods used within Django form classes to clean and validate individual form fields. They are automatically called during form validation after the respective field’s default validation has been performed.
Here’s how clean_<field>() methods work:
- Validation and Cleaning: When you define a form class in Django, each form field gets its method for validation and cleaning. These methods are named clean_<field_name>(), in which <field_name> is replaced by the name of the field.
- Execution Order: These methods are executed after the default field validation. Django first checks the field’s built-in validators, and then if there are any clean_<field>() methods, it calls them one by one.
- Customized Cleaning Logic: In your form class, you can define these methods to implement custom validation and cleaning logic for individual fields. This is particularly useful when you need to perform complex validation or when the validation depends on the values of multiple fields.
- Error Handling: Inside these methods, you can raise a ValidationError if the field’s value doesn’t pass your custom validation criteria. This error can contain a message explaining the reason for the validation failure, which will be displayed to the user.
Here’s a simple example demonstrating the usage of clean_<field>() methods in a Django form:
from django import forms

class MyForm(forms.Form):
    age = forms.IntegerField()

    def clean_age(self):
        age = self.cleaned_data.get('age')
        if age is not None and age < 18:
            raise forms.ValidationError("You must be 18 or older to use this service.")
        return age
In this example, the clean_age() method checks if the provided age is under 18. If it is, it raises a ValidationError with a corresponding error message. Otherwise, it returns the cleaned (validated) value.
Now let’s see how we can use the clean_<field>() methods to rewrite data in another field:
from django import forms

class MyForm(forms.Form):
    start_date = forms.DateField()
    end_date = forms.DateField()

    def clean_start_date(self):
        start_date = self.cleaned_data.get('start_date')
        end_date = self.cleaned_data.get('end_date')

        # Check if start_date is after end_date
        if start_date and end_date and start_date > end_date:
            # If start_date is after end_date, swap the values
            self.cleaned_data['start_date'] = end_date
            self.cleaned_data['end_date'] = start_date

        return start_date
4. Create a custom widget
This is one of the most beautiful approaches because it lets you work with the form from the Angular JS point of view without messing with custom controllers (which is the last point of this manual). This is a frontend solution designed from the backend.
This is usually the best approach when you post-process data in the form (straight inside the browser). You need to know Angular JS programming to go with this solution if you want to make big things, but for simple changes, it is perfectly fine.
Process:
- Create a widget.py file in your app folder with your CustomWidget:
- Example of a new Custom field in the frontend (you can inherit from any other Django Field at your convenience) and overload the render() method to replace the HTML created by the original Widget, then you just replace the HTML returned by the original widget. Just print it out while designing to understand what the server is rendering and rewrite it at your convencience.
- In your forms.py, import your CustomWidget and inside your form class, add a “widgets” attribute which should be a dictionary with the field name as a key and your custom widget as the value. Example: widgets = { “myfield”: MyCustomWidget() }
Example 1: in this example the field will be disabled if some other field is not filled or its value evaluates to False.
class MyCustomWidget(forms.widgets.TextInput):

    def render(self, name, value, attrs=None, renderer=None):
        # Get html
        html = super().render(name, value, attrs, renderer)

        # Transform html to make sure this field is disabled if some other field is not filled
        html = html.replace(
            'type="text"',
            'type="text" min="1" ng-disabled="!some_other_field"',
        )
Example 2: Here is another example that brings a new field (visible only) that will show the maximum points that the program will give when a max number of minutes is defined together with a cost of points_per_minutes:
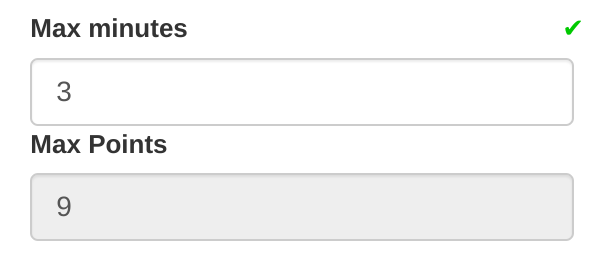
class MaxMinutes(forms.widgets.NumberInput):

    def render(self, name, value, attrs=None, renderer=None):
        # Get html
        html = super().render(name, value, attrs, renderer)

        # Transform html to configure the field to a fixed minimum value
        html = html.replace(
            'ng-readonly="readonly_max_minutes" ',
            'ng-readonly="readonly_max_minutes" min="0"',
        )

        # Put all together with an extra piece of HTML code that will summarize
        # the maximum points the program will give with those "max_minutes"
        # using "points_per_minute" field configured somewhere else
        html = (
            html
            + """
            <label for="points">Max Points</label>
                <input
                    type="number"
                    class="form-control"
                    ng-readonly="true"
                    min="0"
                    ng-value="max_minutes * points_per_minute">
            """
        )

        # Return result
        return html
If you field is a SelectField there are some specific structure to help you inspect data in it.
5. Overwrite the $scope.submit()
This is a frontend solution and it is actually one of the most difficult approaches because it requires incorporing a custom controller to your form to allow you overwrite methods. This solution happily will give you full control of the system from the AngularJS point of view but you will pay back in complexity.
DISCLAIMER: you need advance knowledge about Angular JS programming to go with this solution.
Basically this solutions is based on overwritting the method submit() in side the $scope of your controller with your one. Please check submit() method inside the desired controller at codenerix.js for more information.
To override the default CODENERIX controllers you have to make use of the following attributed inside your GenList class to override the default ones:
- ws_entry_point: set ws_entry_point variable to a fixed value
- static_partial_row: set static_partial_row to a fixed value
- static_partial_header: set static_partial_header to a fixed value
- static_partial_summary: set static_partial_summary to a fixed value
- static_app_row: set static_app_row to a fixed value
- static_controllers_row: set static_controllers_row to a fixed value
- static_filters_row: set static_filters_row to a fixed value
Conclusions
In conclusion, this guide comprehensively explores techniques for transforming and generating data within Django applications, encompassing both backend and frontend solutions. It outlines methods such as overloading the save() method, utilizing Django signals, and leveraging clean_<field>() methods for backend data manipulation. Additionally, it highlights frontend approaches, emphasizing the creation of custom widgets and AngularJS integration. While each method offers unique advantages, developers must carefully consider factors like complexity, maintainability, and project requirements when choosing the most suitable approach. Overall, this guide equips developers with the knowledge and tools necessary to enhance data management and customization in CODENERIX Django applications.
Recent Comments