
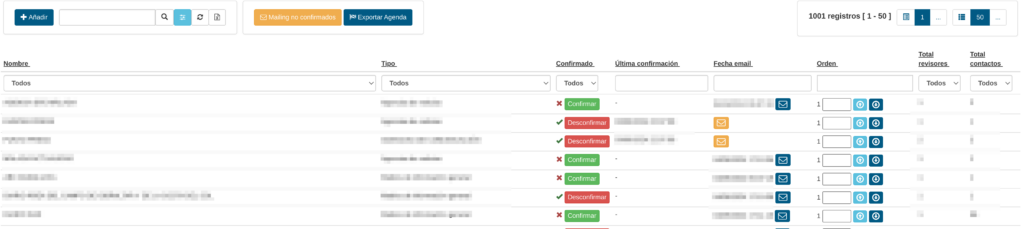
You can customize many details of CODENERIX by telling the software to behave one way or the other. In this tutorial, you will learn how to customize GenList results to get improved listing. This is quite common when you want to do new things, like adding buttons to your lists or showing elements in one way or the other. With a lot of tunning, your website can look like this example:
Let’s explain the parts
- Partials
- What are they? Partials are essentially snippets of HTML code. They represent reusable chunks of your user interface (UI). Think of them as building blocks for your views.
- Why use them? Partials promote modularity and maintainability. They help avoid repeating HTML code and make your codebase more organized.
- How they work: You typically load partials into your main view using AngularJS directives like ng-include or through routing mechanisms.
- Controllers
- What are they? Controllers are JavaScript functions that govern the behaviour and data of a specific portion of your AngularJS application (often associated with a particular partial).
- Why use them? Controllers provide the logic for interacting with your data, handling user input, and updating the view accordingly.
- How they work: Controllers are linked to parts of your view using the ng-controller d-rective. They have access to a special $scope object, which bridges the controller’s data and the view.
- The AngularJS App (Module)
- What is it? The AngularJS app, often called a module, is the container that holds all the pieces of your application together. It defines the dependencies (other modules your app needs) and sets up the overall structure.
- Why use it? The app module is essential for organizing and bootstrapping your AngularJS application. It provides a way to declare components like controllers, directives, filters, and services.
- How it works: You create an AngularJS app using the angular.module function. You then use this module to register various components of your application.
- Filters
- What are they? Filters are functions that transform or format data before it’s displayed in the view.
- Why use them? Filters provide a convenient way to make data more readable or visually appealing. For example, you can use filters to format dates, currency, or uppercase text.
- How they work: You can use filters directly in your templates with the pipe (|) symbol or apply them within controllers or services.
- Illustrative Example: let’s imagine a simple product listing application.
- Partial: A product.html partial would contain the HTML for displaying a single product’s details (name, image, price).
- Controller: A ProductController would fetch product data from a service and make it available to the product.html partial. It might also handle actions like adding a product to a shopping cart.
- App: The myApp module would bring the partial, controller, and any necessary services together.
- Filter: A currency filter might format the product’s price into a user-friendly format (e.g., “19.99€”).
Quick HOWTO
Adding a custom partials, controllers and filters to a GenList is quite straight forward since CODENERIX already manage custom files for you. Let’s watch a quick guide and then we will talk in detail:
- Let’s imagine that you are working on a “shop” Django project with a “book” app/module which has a model named “page” which contains four fields: “title”, “subtitle”, “isbn” and “qrcode”.
- Inside your “book” module folder create a “static/book/” folder that will hold all statics for this module in place. The full path would be “shop/book/static/book/“.
- Inside the newly created folder edit a new file named “pages_rows.html“.
- Inside “pages_rows.html” write your AngularJS Partial’s code thinking that your $scope contains a “row” element that has all the elements you wrote down in your __fields__() method in your GenList or GenModel, so the file would look like:
<td>{{row.title|codenerix}}</td>
<td>{{row.subtitle|codenerix}}</td>
<td>{{row.isbn|codenerix}}</td>
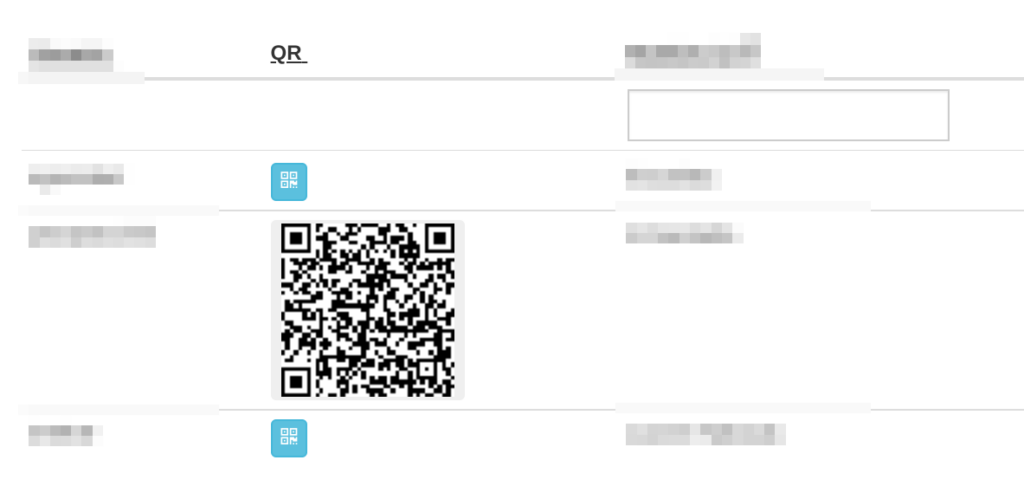
<td>{{row.qrcode|qr}}</td> - And you are all set. Everytime that you visit this PageListView(GenList) CODENERIX will render it using your custom “pages_rows.html” so every row will have 4 columns.
- Watch out your __fields__() methods, because if you add or reduce the number of fields then you will have to update also your partials files, “pages_rows.html” in this example.
Filters in partials
In the example before we used “codenerix” and “qr” predefined filters to produce a result like this:
CODENERIX already bring some ready to use filters that make life easier, they can be used in __fields__() methods, example:
def __fields__(self, info):
    fields = []
    fields.append(("title", _("Title"))
    fields.append(("subtitle", _("Subtitle"))
    fields.append(("isbn", _("ISBN"))
    fields.append(("qrcode", _("QR"), 100, None, "qr:100"))
    return fields
This will render inside the partial as: “<td>{{row.qrcode|codenerix:qr:100}}</td>” showing an image with a QR in your GenList. Keep an eye on the just inserted “|codenerix” filter to your elements specified in your __fields__() method; this is done automatically; for your custom partials, you will have to add “|codenerix” yourself if desired or any other filter at your will.
Some of the most common filters that you can use inside __fields__() (remember to remove the “codenerix:” prefix) method or inside your custom partials are:
- codenerix: this is the most important one since it will try to do the most basic job for you, like:
- Render a ‘–‘ if the content of the field is equal to “null“, “undefined“, or empty string.
- Render as a ✔ or ❌ for fields that are equal to the string “True” / “False” or “true” / “false“.
- It also has arguments like:
- codenerix:bool: will render all results as booleans, ✔ or ❌ if the object evaluates to false or is equal to “null“, “undefined“, or empty string.
- codenerix:skype: it will render a “tel:” link so the user can click on it to make a call.
- codenerix:qr: it will render the string as an image of a QR code that it may render disabled if the object is “null”, “undefined”, or empty string. This filter also accepts the following parameters:
- codenerix:qr:100: being 100, the size of the QR code generated in pixels. At the moment of writing this guide, the filter renders by default using 200px.
- codenerix:link: it will render as a <a> link; by default, it will render the text wrapped by <a> tags linking to the provided text in the object. For example, for “hello/world” it will render as: <a href=”hello/world”>hello/world</a>
- codenerix:link:blank: it will add a target=”_blank” to the render result.
- codenerix:link:icon: it will add a link icon before the text (deprecated).
- codenerix:link:link: it will add a link icon before the text.
- codenerix:link:download: it will add a download icon before the text.
- codenerix:link:onlyicon: it will render only the icon without the text.
- codenerix:link:download:blank:onlyicon: it will render as a download only without text and with target=”_blank”.
- codenerix:copytoclipboard: it will copy the text to the clipboard when clicked, it support arguments:
- codenerix:copytoclipboard:text: it will show a modal window with the provided text.
- codenerix:copytoclipboard:title:text: itit will show a modal window with the title as a title and the provided text as a body.
- When using the modal window, it will close after 2 seconds automatically.
- codenerix:image: it will render as a <img> tag using the input as the path for the image.
- codenerix:link:styletext: it will render as a <img> tag and add a “style=styletext” with the provided text.
- codenerix:round: it will round numbers using Math.round()
- codenerix:round:decimals: it will round to a number of provided decimals.
- codenerix:money:currency: it will add a suffix or prefix to your number; by default, it will add a “?” at the end if no currency is provided. Available currencies are: “euro“, “dollar“, “pound“, “yuan” and “bitcoin“
- abs: executes Math.abs() before returning the value.
- base64_encode: encodes the provided text as a Base 64
- base64_decode: decodes the provided Base64 string
- choice_match:needle: visits all the elements from a list of tuples/lists, checking the first element from each element (tuple/list) and checking if it matches the provided needle. It will return the second element from the selected tuple/list, or if not found, it will return the original input with an added character ‘*‘ at the end.
- cut:wordwise:max:tail: it cuts the string and adds “…” at the end. It cuts at max (returning a sublist of string[0:max]). The argument wordwise may be null or empty and won’t have any effect, but if it is evaluable to true it will cut the string at the last space found so the final string may be shorter than string[0:max]. If tail is defined, tail will be used instead of “…“.
- default:value: returns the value when the input evaluates to “undefined“, “null” or empty string.
- highlightRow:search: it highlights the searched string using <mark> tags around the found text.
- highlightSelect:search:query: it highlights the searched string using <span class=”ui-select-highlight”> tags around the found text if query evaluates to true.
- htmlToPlaintext: convert any string to a text (usually used to display HTML code)
- length: returns the number of elements that have a dictionary (Strings and Lists already implement lengths)
- nicenull: it will return “—” if the object evaluates to false otherwise it will return the object.
- round:decimals: it execute Math.round() on the given number with a precision of decimals.
- split:splitchar:splitindex: split the string using the splitchar and select from the splitted result the element splitindex.
- strReplace:search:final: find and replace search in the string with final.
- weekday: given a day of the week it converts to the day of the week word in English (Example: 1 is converted to Monday and 7 to Sunday)
⚠ Remember to remove the “codenerix:” prefix on __fields__() methods. ⚠
Autodiscover for statics
CODENERIX comes with an Autodiscover system for static files that support languages and user profiles. For the example before, CODENERIX will try to find (in this order) the static files it needs to render the website (and it will choose over the existing one before falling to the default ones inside CODENERIX). The best way is to learn how this work by example:
- Partials:
- book/pages_rows.username.es.html
- book/pages_rows.username.html
- book/pages_rows.admin.es.html
- book/pages_rows.admin.html
- book/pages_rows.administrator.es.html
- book/pages_rows.administrator.html
- book/pages_rows.es.html
- book/pages_rows.html
- < CODENERIX default >
- Partials (headers):
- book/pages_header.username.es.html
- book/pages_header.username.html
- book/pages_header.admin.es.html
- book/pages_header.admin.html
- book/pages_header.administrator.es.html
- book/pages_header.administrator.html
- book/pages_header.es.html
- book/pages_header.html
- < CODENERIX default >
- Summary (footer):
- book/pages_summary.username.es.html
- book/pages_summary.username.html
- book/pages_summary.admin.es.html
- book/pages_summary.admin.html
- book/pages_summary.administrator.es.html
- book/pages_summary.administrator.html
- book/pages_summary.es.html
- book/pages_summary.html
- < CODENERIX default >
- Angular APP definition:
- book/pages_app.username.es.js
- book/pages_app.username.js
- book/pages_app.admin.es.js
- book/pages_app.admin.js
- book/pages_app.administrator.es.js
- book/pages_app.administrator.js
- book/pages_app.es.js
- book/pages_app.js
- < CODENERIX default >
- Angular Controllers definition:
- book/pages_controllers.username.es.js
- book/pages_controllers.username.js
- book/pages_controllers.admin.es.js
- book/pages_controllers.admin.js
- book/pages_controllers.administrator.es.js
- book/pages_controllers.administrator.js
- book/pages_controllers.es.js
- book/pages_controllers.js
- < CODENERIX default >
- Angular Filters definitions:
- book/pages_filters.username.es.js
- book/pages_filters.username.js
- book/pages_filters.admin.es.js
- book/pages_filters.admin.js
- book/pages_filters.administrator.es.js
- book/pages_filters.administrator.js
- book/pages_filters.es.js
- book/pages_filters.js
- < CODENERIX default >
🐰Easter egg: The same thing also works on CODENERIX Django templates. 😉
Recent Comments