In this article, you will learn everything about CODENERIX‘s authentication system.
Every request that is getting to CODENERIX is passing through several middlewares, and some of them may be authentication backends. Those authentication backends are used to grant users into the system since some parts of its maybe have limited access.
Authentication
Before communicating with the server, you must ensure you have enough rights to resolve the request as expected. Usually, when you work with a front-end, you will use views without permission to process data, so your Anonymous users won’t have problems using the website.
Therefore, if you have an external app that would like to communicate using the API against views that require some permission levels, then you must know that CODENERIX will require a user to be granted into the system. If you do not wish to log in as a user, you must define some Public Views that will do the authentication job on your way (or avoid doing any). Of course, they can inherit from CODENERIX for certain features.
For all the rest of us that don’t want to mess up with authentication, several mechanisms are working behind Django and CODENERIX to provide user-level access:
- One of the next Authentication systems must perform to log a user in:
- Django Authentication System will decide if the user is granted into the system. This
- CODENERIX‘s ActiveDirectory middleware will decide if the user is granted into the system. It will use an Active Directory server to determine if the user is granted. Some extra comments about this authentication method are at the end of the page.
- CODENERIX‘s TokenAuth middleware will decide if the user is granted into the system. It is the system we will explain below since it is responsible for authenticating remote CODENERIX‘s API requests.
- CODENERIX‘s LimitedAuth middleware will decide if the user is granted into the system right now
When installing those middlewares from CODENERIX, set any “codenerix.authbackend” middleware straight after Django‘s “AuthenticationMiddleware“. Example:
MIDDLEWARE = [
    "django.middleware.cache.UpdateCacheMiddleware",
    "django.middleware.common.CommonMiddleware",
    "django.contrib.sessions.middleware.SessionMiddleware",
    "django.middleware.locale.LocaleMiddleware",
    "django.middleware.csrf.CsrfViewMiddleware",
    "django.contrib.auth.middleware.AuthenticationMiddleware",
    "codenerix.authbackend.TokenAuthMiddleware",    <--------------- It will be explained below
    "codenerix.authbackend.LimitedAuthMiddleware",  <--------------- It will be explained below
    "codenerix.authbackend.ActiveDirectoryGroupMembershipSSLBackend", <--- It will be explained at the end
    "django.contrib.messages.middleware.MessageMiddleware",
    "django.middleware.clickjacking.XFrameOptionsMiddleware",
    "codenerix.middleware.SecureRequiredMiddleware",   <---- This one will make sure the website is working with HTTPS (depending on your config)
    "codenerix.middleware.CurrentUserMiddleware",      <---- This will let to have the logged in user object everywhere
    "django.middleware.cache.FetchFromCacheMiddleware",
]
GenPerson
Remember that CODENERIX‘s TokenAuth and LimitedAuth backends will check if the user is disabled at a certain moment. This is an optional feature that is auto-checked on every authentication request. To make your life easier, you can import “GenPerson” from CODENERIX and inherit from it in your model, for example:
from codenerix.models_people import GenPerson

class Person(GenPerson, CodenerixModel):
    phone = models.CharField(_("Phone"), max_length=16, blank=True, null=True)
GenPerson will define a user, a name, a surname, a disabled, and a creator field. From models_people, you can import GenRole as well, which makes it easier to manage different roles for different people. We will talk about it in a different post.
If you would like to implement the disabled feature yourself, you must link the “User” model from Django against another model, which must contain a field named “disabled”, which will be a DateTimeField, that links between the “User” model and your new model must have a related_name “person” or “people” that are the ones CODENERIX will lookup to check if it can go forward to check if the user disabled, example:
class Person(models.Model):
    user = models.OneToOneField(User, on_delete=models.CASCADE, blank=True, null=True, related_name='person')
    name = models.CharField(_("Name"), max_length=45, blank=False, null=False)
    surname = models.CharField(_("Surname"), max_length=90, blank=False, null=False)
    disabled = models.DateTimeField(_("Disabled from"), null=True, blank=True)
LimitedAuth
This auth-backend middleware is used to:
- Check how long the user has been without activity; it will kick it out if it has been away too long.
- Check if the user can be logged in at certain hours.
In your configuration, you can use the following:
- SESSION_EXPIRE_WHEN_INNACTIVE: number of seconds the user can be inactive on the website without being logged out.
- SESSION_SHIFTS: list of hours of the day when all users must be logged out.
This middleware you must install after Django‘s “AuthenticationMiddleware“:
django.contrib.auth.middleware.AuthenticationMiddleware
TokenAuth
The basics of TokenAuth are:
- Please send a request to some URL that will make a CODENERIX view answer (GenList, GenCreate, GenDetail, GenUpdate, GenDelete, or derived classes).
- The system will require you to include a few parameters in your request:
- authtoken: this is the authentication token. We will extend the information below at “How does authtoken work“.
- authuser: is the user we are authenticating against.
- json: is the request we are trying to send to the server
- force_rest_api: if it is defined (no matter the value), it will force the REST API. If it does not appear, this feature will be disabled (you may use any other way to enable REST API on your call, check below at “RESTful API“).
- authjson_details: [optional, default=0] If we set it to “1” (or “true”, or “t”), it will return details included with the answer
How does authtoken work
To build the authtoken, we have several ways, and we must focus on our configuration since we can use several authtoken models for authentication.
First, we must check our configuration and make sure that “AUTHENTICATION_DEBUG” is enabled and AUTHENTICATION_TOKEN is a dictionary configured as you expect authentication to work. Example with debugging and all authentication methods enabled:
AUTHENTICATION_DEBUG = True
AUTHENTICATION_TOKEN = {
    "key": "hello",
    "master_unsigned": True,
    "master_signed": True,
    "user_unsigned": True,
    "user_signed": True,
    "otp_unsigned": True,
    "otp_signed": True,
}
The AUTHENTICATION_TOKEN dictionary has several entries. We will focus on the last 6, which are combinations of:
- master, user & top: those are authentication models
- unsigned & signed: those are variants to the authentication model
The first entry, “key“, is directly associated with the “master” authentication model.
Unsigned variants will try to match the user’s given authtoken directly with the chosen key by the authentication model. Each model will choose the key for matching differently.
Signed variants do exist to sign the “json” string together with the “authuser“, so they can not be changed by a man-in-the-middle. Signed requests will be denied if the signature fails.
NOTES:
- We must mention that any request will be granted if just one of the authentication models answers positively.
- All requests require authuser to be filled, and the user MUST EXIST.
Master authentication:
The “key” for authentication will be configured in your configuration’s “key” entry of the AUTHENTICATION_TOKEN dictionary.
- master_unsigned: the system will try to match “authtoken” with “key“. This is the most straight authentication method since all requests and users will match with the same “key” (the one in your configuration).
- master_signed: the system will try to match “authtoken” with sha1( authusername + json + key )
- In your config, “key” is configured with a string: “hello“
- In your request authuser is: “theuser”
- In your request, json is: {}
- The algorithm will be:
      sha1( "theuser" + "{}" + "hello" ) =
      = sha1( "theuser{}hello" ) =
      = 401339988b89ef71e34f614f78bba076550a1033
User authentication:
In every of our CODENERIX projects, we use a Person model to manage all the information about the people in the system. This model is linked 1to1 with the User model from Django. This means we don’t hold any real information from the user inside the User model from Django, neither “First name” nor “Last name“. All the rest of the fields are used as Django does “username“, “password“, “email“, … we make all of this simpler using GenPerson (explained at the beginning of this post).
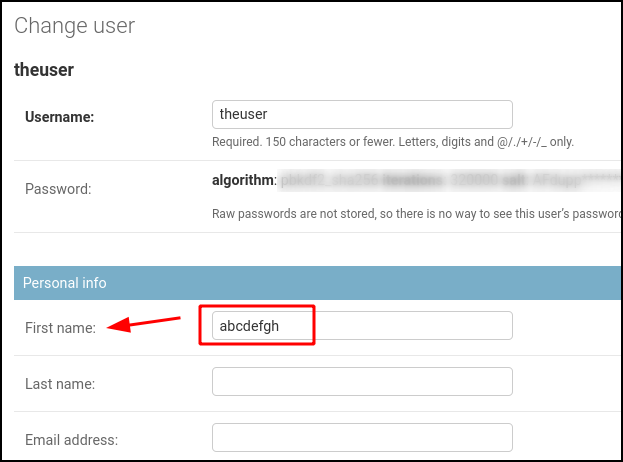
Since we decided not to work with “First name” and “Last name” to hold personal information, we use the “First name” field from the User model from Django for the “User authentication” system. CODENERIX will use the string inside the “First name” field as a key. To show this example, we will configure “abcdefgh” as the theuser‘s first’s name.
In Django‘s administration panel, it would look like this:
- user_unsigned: the system will try to match “authtoken” with the user’s First name field from Django’s User model.
- user_signed: the system will try to match “authtoken” with sha1( authusername + json + First Name )
- In your request, authuser is: “theuser” (and the First Name field from Django’s User model is “abcdefgh” )
- In your request, json is: {}
- The algorithm will be:
sha1( "theuser" + "{}" + "abcdefgh" ) == sha1( "theuser{}abcdefgh" ) == 0da2a3f2f7cf0ae0cebe254767c3ebb1667fd8d3
OTP authentication:
This authentication method works in the same way as the User authentication method. Still, instead of the user’s First name directly, it will use the OTP number created from using First name as the seed for the OTP algorithm.
- user_unsigned: the system will try to match “authtoken” with the user’s OTP( First name ) field from Django’s User model.
- user_signed: the system will try to match “authtoken” with sha1( authusername + json + OTP( First Name ) )
- In your request, authuser is: “theuser” (and the First Name field from Django’s User model is “abcdefgh” )
- In your request, json is: {}
- The algorithm will be:
sha1( "theuser" + "{}" + OTP( "abcdefgh" ) ) == sha1( "theuser" + "{}" + 633917 ) ) == sha1( "theuser{}633917" ) == cfb51398eeefd28814a5e70f81a153be1c2a0c40
Notes when using User and OTP authentication system:
When using those authentication methods the first time, you may get an OSError exception, like this one:
OSError: To use a user/otp key, you have to set user_signed, user_unsigned, otp_signed, or otp_unsigned to True and set the user key in the user’s profile to some valid string as your token (first_name field in the user’s model)
The system requests you fill in the user’s “First name” with the authentication key to ensure those authentication methods will work properly.
ActiveDiretoryGroupMembershipoSSLBackend
This is the authorization backend for Active Directory in Django.
This authentication method has been working in production for a long time on old servers. We are unsure how the compatibility is on servers nowadays since we have not tested it. The feature is here and can be improved or fixed if it lacks compatibility, so you are welcome to send Pull Requests.
We won’t explain much about this feature since we consider it to be an advanced feature. Anyway, some description is required so advanced users can use it.
To get it working, you must add it to middleware (check the example at the top of this post) and then set the configuration with the next fields:
# Authorization backend for Active Directory in Django

# Configuration parameters
# AD_SSL = True                             # Use SSL
# AD_CERT_FILE='/path/to/your/cert.txt'     # Path to SSL certificate
# AD_DEBUG_FILE='/tmp/ldap.debug'           # Path to DEBUG file (if none, Debugging will be disabled)
# AD_LDAP_PORT=9834                         # Port to use
# AD_DNS_NAME='NTDOMAIN.CODENERIX.COM'      # DNS nameserver if different than NT4 DOMAIN
AD_LOCK_UNAUTHORIZED=True                   # Unauthorized users in Active Directory should be locked in Django
AD_NT4_DOMAIN='NTDOMAIN.CODENERIX.COM'      # NT4 Domain name
AD_MAP_FIELDS= {                            # Fields to map:   left=Django   right=Active Directory
    'email':        'mail',
    'first_name':   'givenName',
    'last_name':    'sn',
}
Recent Comments